How to Determine Quality Keywords for Writing Articles in Blog and Website

On this occasion, Mimin will share one way to determine quality keywords to be used as material for making articles later. But before that, let's first look at a brief explanation of keywords.

What are the keywords?

A Keyword is a word or series of words used by someone to search for information on the internet through search engines, such as Google, Yahoo, and Bing. Keywords are divided into two categories, namely short-tail keywords and long-tail keywords.

Short Tail Keyword (STK) is a keyword that only consists of one word, such as Facebook, Google, Yahoo, Twitter, Wikipedia, and others. This STK will later be connected to a blog or website along with the article, through their respective URLs.

Long Tail Keywords (LTK) are keywords that consist of several words and can be formed into a sentence, such as how to get rich, how to blog, what are keywords? cooking tutorials to be a good mother, the internet, and so on. This LTK is more directed at an article on a blog or website. In addition, LTK plays an important role in SEO because of its wider use compared to STK.


If you want to learn more about keywords, you can search for them directly on Google. Next, let's look at one way to determine quality keywords to be used as material for writing articles.


1. Open the Ubersuggest site or you can simply "Click Here".

2. Enter keywords either STK or LTK as you wish, such as AdSense or what is AdSense. Don't forget to change the country's location according to the location of the destination country and the language used by your blog or website. Next, click Search.

https://www.practicalintroduction.com/2021/08/how-to-determine-quality-keywords-for.html

3. After that, scroll down and various keywords will appear related to the keywords you typed earlier. Here, you can see how many people found that keyword, how high the CPC (Cost Per Click) was for that keyword, and how difficult it was for you to find that keyword with other users.

4. To determine quality keywords, you can see how many publishers there are. The higher the number of publishers, the better the quality of the keyword. However, the competition will be more difficult for these keywords. Therefore, look for keywords that have a large number of publishers but little competition, to make it easier for you to be first in the search.

In addition, you can use keywords that have a small number of publishers and competitors to make it easier to enter the first page of searches. Even with keywords that have a small number of publishers, but manage to enter the first page of search results, this will increase your Alexa Global Rank, which makes your blog or website more popular.

5. After determining which keywords you will use, enter these keywords in the title of the article and also in the content of the article later.

Example:

For example, We will choose the keyword "AdSense on Blog" on the second page of the keyword data that we have entered previously, namely AdSense. Then we created a new article with the title "How to Register for AdSense on a Hosted Account Only Blog". After that, we changed the content of the article by including the keyword in the first 100 words to make it more SEO.

That's it for the article How to Determine Quality Keywords for Writing Articles This Time. Hopefully, it will be useful. Thank you all for visiting my blog and wait for the next update. 😊

Share:

A Complete and Easy Guide to Creating Questions on Google Forms

One of the impacts of the COVID-19 pandemic is that the amendment within the faculty learning system to via daring. For many faculties, this learning still should accommodate several things and a way to train students to answer queries while not cheating by the gap the web.

What strategies will lecturers use to make daring queries by keeping students from cheating? Google Forms offer such learning ideas. Google explains that you simply will produce, submit, and grade quizzes with Google Forms.

1. A way to build quiz queries exploitation Google kind

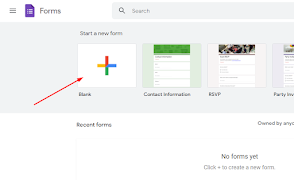
  • Open Google Forms, then click the blank icon (+).
https://www.practicalintroduction.com/2021/08/a-complete-and-easy-guide-to-creating.html
  • At the highest right, click settings.
  • Click Quiz then build this a quiz.
  • Optional: to gather email addresses, click General then Collect email addresses.
  • Click Save.
https://www.practicalintroduction.com/2021/08/a-complete-and-easy-guide-to-creating.html

2. A way to produce answer keys, assign points (values), and add automatic input. 

We will produce answers for brief answer varieties, Multiple selections, Checkbox, Dropdown, Multiple selection map, and Checkbox grid. Here's a way to produce a solution key:

  • To feature a question, click "add the question".
  • Fill in your Question and Answers.
  • At the bottom left of the question, click the Answer key.
  • Choose the add "answer feedback" then click the "correct Answers".
  • At the highest right of the question, choose what number points the question is price.
  • Optional: to feature a written rationalization or YouTube video to evidence, click here.
  • Add answer input.
  • Optional: To answer the question or answer choices, click Edit.

"Note: you'll assign points and add feedback on any style of the question".

3. How to choose the display during and after the quiz. 

We can choose whether people can see the unanswered questions, correct answers, and how much the questions score. Here's how:

  • In Google Forms, open the quiz.
  • At the top right, click Settings.
  • Click General.
  • Select the "Respondents can:" section.

4. Use bolted mode for quizzes.

We can facilitate students to keep centered whereas taking quizzes and exams on their Chromebooks. Once students take quizzes in bolted mode, they will not browse alternative sites or open alternative applications. If a student exits the quiz or opens another tab, the teacher is going to be notified by email. In addition, by enabling bolted mode, some extensions and keyboard shortcuts are square measures disabled. Also, confine in mind that bolted mode can collect student email addresses and solely prohibit quizzes to your domain. You wish a G Suite for Education Account, a Chromebook managed by your faculty for every student, and Chrome OS 75 or later to use bolted mode.

Here's a way to alter bolted mode:

  • In Google Forms, open the quiz.
  • At the top right, click Settings, then Quiz.
  • Select the "Enable key mode".

5. Give a time limit on the question

This setting will also give students a classroom-like atmosphere and force them to focus on the problem. Here's how:

  • On the Google Forms page, click the three dots icon, then click Add-ons
  • Search for Formlimiter, install
  • Click allow displaying the script in your Google account
  • After that, the setting process will appear where you can enter the time limit and the date the question is done. Click Save and Enable
  • If the question has reached the allotted time, then the question will be closed by itself.

6. Give a score on the quiz that is done.

  • In Google Forms, open the quiz.
  • At the top, click Feedback.
  • Click Individual.
  • To move between individuals, click Previous or Next.
  • Search for the question you want to rate, namely: - At the top right, enter the number of points generated by the response. - Under the answer, click Add feedback.
  • Write input, then click Save.

7. Share results via Google Form.

 You can send student work results via email to each of them individually. Here's how:

  • In Google Forms, open the quiz.
  • At the top, click Feedback, then Individual.
  • At the top right of the response with the registered email address, click Release score.
  • Check the box next to the person you want to email.
  • Click Send email and release.
Share:

Getting to Know the Computer Components for Beginners

If you have ever looked at a computer device, then you will realize that a complete computer is made up of many different components. Do you know what the parts of the computer components are? What is the use of each computer component?

Here are some of them that you must know to be able to operate the computer more:


Monitor


https://www.practicalintroduction.com/2021/08/getting-to-know-computer-components.html


A monitor is a screen on a computer that has the function of displaying images or text that has been processed by the computer. The new monitor can work if it is connected to a computer. Again, the monitor is not a computer, only a complementary part of the computer.

In the past, the computer screen display was classified as very ancient in the form of a large and "bloated" rectangle. Because of its ancient shape, many people have referred to computer screens as "tube screens".

But gradually, along with the development of modern technology, this form of tube screen monitor began to be replaced by a variety of thinner, select, and wide screens. The current modern screen shape and widely used by modern society is known as the LED and LCD screens.


Processor


https://www.practicalintroduction.com/2021/08/getting-to-know-computer-components.html


Just as a car can run because it has an engine, so does a computer. Computers obviously have special machines to operate according to your commands and desires, such as creating documents, playing songs and videos, surfing the internet, and so on. Computers can work in such a way as to process information into a visual display (output) because they are assisted by a special machine called a processor. 

In the IT world, the processor is known as the part of the computer that functions as the "brain" of the computer. All commands executed by the computer will be processed by the processor. The simple picture is like this: first, you enter input (data) into the computer. Then, the computer will process your data according to the most appropriate directions. This directive can be executed by a computer thanks to the "brain" and artificial intelligence it has in the processor. Finally, the processed data will appear as the output or result you want.


Hard disk

https://www.practicalintroduction.com/2021/08/getting-to-know-computer-components.html


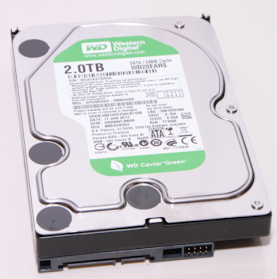
As you can see, when you own a computer, your computer will definitely have a lot of storage space. To check, you can open the File Explorer section, then click on Local Disk C and Local Disk D listed on the left side of the screen. Each local disk has a very large size, generally reaching hundreds of GB. With this large storage space, you can store various data at will, ranging from written document data, PDF files, MP3 or music files, video and movie files, as well as hundreds to thousands of photos. 

This large hard drive size will usually be very helpful in the process of installing and operating various applications on your computer. So you don't have to worry if one day, your application crashes during operation. The space owned by the computer is very large and is able to support the performance of each application to the maximum. 

The size of each computer's hard drive is generally different. But in today's modern era, the minimum size of a computer hard drive is 160 GB. You can also increase the size of this space by using an external hard drive of up to 1 terabyte (TB).


RAM


https://www.practicalintroduction.com/2021/08/getting-to-know-computer-components.html


Another part of the computer component that you need to know when learning computers is RAM. What is RAM? RAM stands for Random Access Memory. The function of this RAM is to temporarily store memory on the computer. 

So, before the data is processed by the processor, this data is stored in RAM first. The data will also be stored back in RAM when finished processing by the processor before being displayed as output to the user (user). If likened to, then RAM is a place of "temporary transit" of any data before and after processing.


VGA


https://www.practicalintroduction.com/2021/08/getting-to-know-computer-components.html


The next component of a computer is VGA. To be able to display a visual image of any computer data on the screen, we need a tool called VGA. The correct term is actually a graphics card, but the term commonly known in the computer world is VGA.

VGA is short for Video Graphics Array. This VGA display was the display standard for the first analog computers in 1987. Now, the VGA display standard is no longer used, replaced by a more modern graphics standard, namely a computer graphics card. Even so, the display of Windows-based computer devices still uses VGA a lot, because VGA is still compatible (supported) by many graphics cards.

The term VGA is also often used to refer to a screen resolution of 640 x 480. There are also people who call VGA by other names, namely video cards, display cards, video adapters, graphics adapters, graphics boards, display adapters, and graphics cards.


Motherboards

https://www.practicalintroduction.com/2021/08/getting-to-know-computer-components.html


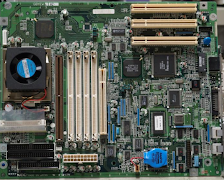
The motherboard is also known as the mainboard. The motherboard is the most essential computer component. It is shaped like a thin board with many cable connections on it. The function of this motherboard is to accommodate all the other components of a computer.

Often, a computer or laptop whose motherboard is damaged can't be repaired forever, so it's unlikely to be repaired. Then you should be prepared to buy other computer equipment if the computer technician has sentenced your device to damage is located on the motherboard.

The role of the motherboard in a computer is indeed very vital because the purpose of the motherboard itself is to connect all the components in the computer to be able to interact and work with each other.

The composition of the motherboard itself is a network of computer components that have been described previously, including the processor, hard disk RAM, video card, and many others.

The motherboard plays an important role in regulating the BIOS or Basic Input Output System of the computer, VGA, processor, RAM, and adding additional cards such as PCI and ISA.

If you have the opportunity to dissect your computer or laptop, you will find a board shaped like an electronic circuit. The electronic circuit board is called the motherboard.


Power Supply

https://www.practicalintroduction.com/2021/08/getting-to-know-computer-components.html


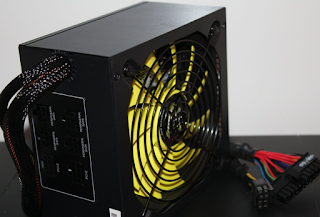
This one computer component is also very important for the computer. This component is the power supply. The power supply has the function of supplying electricity from PLN to the computer.

The form of the power supply is usually a box with many wires connected to each other. Without a power supply, the computer will not get a power supply to turn on and operate. So, you need to make sure the computer is plugged into the power supply and power supply properly so that it can turn on.


Casing


https://www.practicalintroduction.com/2021/08/getting-to-know-computer-components.html


The outermost part of the computer component that we can see at any time is the casing. Casing serves as a place where all computer components are placed. The casing also becomes a "protective shield" for the computer from small particles such as dust.

Dust particles can obviously damage and interfere with the running of the computer system. Therefore, you are advised to use a computer that has a complete case.

Even without a casing, the computer can operate, but the casing also has another role, namely to protect users from electric shocks that flow through the computer. Therefore, the role of the casing is becoming increasingly important in computers.

Thank you all for visiting my blog and wait for the next update. 😊

Share:

How to Install LaTeX Latest Version for Beginners 2021

Like Microsoft Word, LaTeX can be used as a word processor and document maker. The advantage of LaTeX over Microsoft Word is that it has a more dynamic appearance. LaTeX is very useful for friends who are compiling theses, theses, dissertations, and journal papers.

Here are the advantages of LaTeX compared to other document makers. 

1. Open Source, Free alias Free.
2. LaTeX files are small, so they are not burdensome to the computer system.
3. There are many choices of fonts.
4. Can create and display mathematical formulas which are usually difficult to make in Microsoft Word.
5. Available and can run on any OS (Windows, Linux, MAC, etc.).

For those of you who are new to LaTeX or are using LaTeX for the first time, of course, it will feel strange if you encounter the TeX language syntax code and have to memorize the syntax. At first, it will be difficult, but it will be easy if you are used to encountering LaTeX syntax code; 

For Windows users, an internet connection is required to be able to download packages, but if you use Linux, the full package is already installed the first time you install it. 

To be able to see the results, the document needs to be compiled, so when working, it is usually necessary to compile it repeatedly to ensure the results are as desired. 


Here are the MiKTeX installation steps:


https://www.practicalintroduction.com/2021/08/how-to-install-latest-version-of-latex.html


But, of course, there are disadvantages to using LaTex, including the following:

There are many LaTeX editors available, including TeXmaker, TeXstudio, and others. But in this tutorial, you will learn how to create a LaTeX document using MiKTeX. MiKTeX itself already provides its default TeX editor, namely TeXworks. MiKTeX is also available in portable form, so you can directly use it without having to install it. In addition, you can also use online TeX editors, one of which is overleaf.com. MiKTeX is available for free. You can get it at miktex.org.

1. Go to the MiKTeX.org site.

2. Download MiKTeX. The last version on 6/8/2021 was basic-miktex-21.6-x64.exe. 

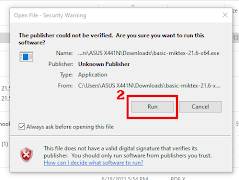
3. After the file is successfully downloaded, run the Basic MiKTeX Installer application.


https://www.practicalintroduction.com/2021/08/how-to-install-latest-version-of-latex.html


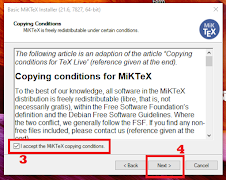
4. Check the text, click "I accept the MiKTeX copying conditions," then click Next.


https://www.practicalintroduction.com/2021/08/how-to-install-latest-version-of-latex.html


5. In the Installation scope, select "Install MiKTeX for anyone who uses this computer (all users)." Then click Next.


https://www.practicalintroduction.com/2021/08/how-to-install-latest-version-of-latex.html


6. Select the location of the Installation Directory. Click Next.


https://www.practicalintroduction.com/2021/08/how-to-install-latest-version-of-latex.html


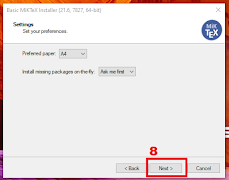
7. In Settings, you can specify the desired default size and options for determining packages. Then click Next.


https://www.practicalintroduction.com/2021/08/how-to-install-latest-version-of-latex.html


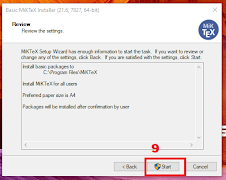
8. Check back what you selected in the previous installation process in the Review. If you are sure, click Start to start the installation process.


https://www.practicalintroduction.com/2021/08/how-to-install-latest-version-of-latex.html


9. Wait for the execution process to finish.


https://www.practicalintroduction.com/2021/08/how-to-install-latest-version-of-latex.html


10. When the executing process is complete, click Next.


https://www.practicalintroduction.com/2021/08/how-to-install-latest-version-of-latex.html


11. Uncheck "Check for updates now" if you are using the latest MiKTeX Installer.


https://www.practicalintroduction.com/2021/08/how-to-install-latest-version-of-latex.html


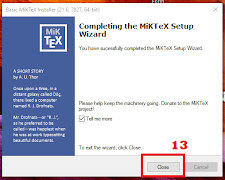
12. The installation process is complete. Click Close.


https://www.practicalintroduction.com/2021/08/how-to-install-latest-version-of-latex.html


After the installation process is complete, MiKTeX and TeXworks are ready to use. Next, you will learn how to create a simple LaTeX document. Thank you all for visiting my blog and wait for the next update. 😊
Share:

How to Remove Red Lines in Microsoft Word 2010 and Microsoft Word 2013

For those of you who often actively open Microsoft Word worksheets, of course, you know how it feels when typing, and then colorful wavy lines, such as red, blue, etc., appear under the text. So the text becomes difficult to read. As a result, we have to delete or remove the red line first so that the document is more readable.

As for how to remove the red line, it's very easy. This is because the red line under the text comes from the default settings of the Microsoft Word program, which apply to all versions starting from 2007, 2010, 2013, and 2016.

This setting makes it easier for users to check the spelling of each word, whether it is correct or not. If it is true, then the red line will not appear and vice versa, if it is false, it will appear automatically. Unfortunately, the default language in Microsoft Word is English (US), so if we type using a different language with the settings, we will find a lot of wavy red lines in your document because we assume that the writing we type is wrong because it is not from English (the language that has been set).

Unlike the green line in Microsoft Word, the green line under this article appears because the grammar or grammar that you typed in the worksheet is wrong according to the grammatical arrangement. Its function is more or less the same as the blue line in Microsoft Word.

After reading the brief explanation above, it means that you already know the cause of the wavy red line suddenly appearing under the writing in Microsoft Word.

Next, we will try to remove red and green lines in Microsoft Word very easily and quickly, as summarized in the post below.

How to Remove Red Lines in Word

The Check Spelling and Grammar features in Microsoft Word are actually very helpful when writing documents. His ability to automatically check his wrong spelling in Microsoft Word is clearly very useful in minimizing errors when typing in Microsoft Word. However, for those of you who want to remove the red line underwriting in Microsoft Word, here is the review.

In this tutorial, I am using Microsoft Word 2010 and 2013. Steps to Remove Red Lines in Microsoft Word 2010 and 2013.

Please open the Microsoft Word application on your computer or laptop.

1. Next, you can press the "Office Button" located in the upper left corner.
2. After that, you can open the settings menu by clicking "Word Options".

https://www.practicalintroduction.com/2021/07/for-those-of-you-who-often-actively.html

3. Next, on the "Word Options" pop-up menu, you go to the "Proofing" tab to start opening its submenu.
4. In the "When correcting spelling and grammar in Word" section, select "uncheck" in the following section.

  • Check your spelling as you type.
  • Mark grammar errors as you type

After unchecking that section, the red line in Word will no longer appear automatically.

https://www.practicalintroduction.com/2021/07/for-those-of-you-who-often-actively.html

6. If everything is finished, you can save it by clicking the OK button.

😉


Steps to Remove Red Lines in Microsoft Word 2013

1. Please open the Microsoft Word software on your PC or computer.

2. Then you go to the File menu tab to open the settings in Microsoft Word.

https://www.practicalintroduction.com/2021/07/for-those-of-you-who-often-actively.html


3. After that, you go to the Options menu to select advanced options.

https://www.practicalintroduction.com/2021/07/for-those-of-you-who-often-actively.html

4. In the Word Options section, open the Proofing menu, after which you search for the When correcting spelling and grammar in the Word category.

If you have found it, uncheck this option.

  • Check to spell as you type
  • Mark grammar errors as you type

https://www.practicalintroduction.com/2021/07/for-those-of-you-who-often-actively.html

5. After unchecking the two options above, you can now save them by clicking the OK button.

How easy is it? Actually, all versions are more or less the same, maybe only different in the layout of the menu.

Thank you all for visiting my blog and wait for the next update. 😊

Share:

Tips and How to Solve the Problem of Computer Restart Frequently

Tips and ways to deal with computer problems that often restart frequently. Various reasons cause the computer to restart frequently. Starting from being caused by RAM that does not fit during installation, computer cable cables that are not installed tightly, as well as the result of a lot of dust and dirt in computer equipment that causes damage to the system and computer equipment. Therefore, special care is needed on the computer so that there are no problems with the computer, which often restarts frequently. Of the many complaints about computer problems that often restart frequently, it turns out that most of the damage occurs to the computer hardware system, for example, damage to the processor, VGA, ram, hard disk, and other types of damage. 


The computer restart frequently due to overheating of the processor


Read more :


The processor is the brain of a computer unit. If the computer brain is certain that the computer you are using will experience problems and disturbances, If the Processor receives a workload that exceeds its usual capacity, of course, Processor will overheat, or what is commonly referred to as Processor overheating. To overcome and find out if the processor overheats, you can follow the following guide. 

1. Please check your computer's processor temperature with the computer hardware menu or monitor in the BIOS settings. 

2. Use processor temperature program, for example, CPUID hardware monitor CPU to check it. 

3. You can also open the computer case and feel the temperature of your computer.


https://www.practicalintroduction.com/2021/08/tips-and-how-to-solve-problem-of.html


How to fix the computer restart frequently due to processor overheating by taking the following steps to repair processor overheating: 


1. Clean regularly and periodically your computer case, as well as your computer's processor cooler, using a clean and soft paintbrush. Do this in an empty room so that dust and dirt can be left and lifted freely. 

2. Replace the thermal paste or paste if it has dried up with a new one. This paste serves to glue processors with coolers or CPU fans.


https://www.practicalintroduction.com/2021/08/tips-and-how-to-solve-problem-of.html


How to solve The computer restart frequently due to power supply shortages or inrush current. 


If the incoming current lacks power or power supply through the power supply, the computer will certainly not work optimally and well. For that, you can check manually on the power supply whether the fan on the power supply is running normally, and make sure it is protected from dust on the power supply. You can also clean the dust and dirt power supply so that the computer power supply works properly.


How to fix the computer restart frequently due to bad sectors on the hard drive (hard disk)? 


The computer often restart frequently. This can also be due to the hard disk being damaged, or the chip not spinning properly. The effect of this bad sector hard disk is that the computer often experiences a blue screen of death, which is blue on the computer screen and results in the computer restart frequently by itself. The fix can be done by activating the Scandisk or check the disk program on your computer. I periodically defrag the hard drive and turn off the computer by shud down.


The cause of the computer restart frequently can be due to faulty RAM or damaged memory. 


This can happen due to dirty ram on the computer, a lot of dust that covers the computer RAM, so that the brass plate in the computer memory can not be read by the motherboard to its full potential. This causes the computer to restart frequently. How to fix it You can clean the ram regularly, so that the computer memory can be read by the motherboard to the maximum. It's a short article on how to deal with a computer that often restart frequently. Hopefully, this article can help solve your problem. The admin is very proud of this article can be useful for those of you who have difficulty maintaining a computer and dealing with computer restart frequently. 

Thank you all for visiting my blog and wait for the next update. 😊

Share:

Happy Wolrd Teacher Day

Daily Page View

Label

Adobe Acrobat Adobe Photoshop Alexa Rank Andorid Application Art Austria BUMN Beginner Belgium Blog Community Blogger Bupati Gresik CPNS/PPPK Canada Coin Market Cap Computers Cosmology Cryptocurrency Dancing Denmark Doctoral Doker Education Educational Excel Excel Table Features Film Finland French Gadget Gallery Garuda Emas Germany Google Analytics Google Form Hardware Homestay Hong Kong Ilovepdf Indrawan Vpp Interior Design Ireland Italy KKPR dan PKKPR Kampung hijau Karang Taruna Karir/Career Keyword Keywords LKPM LaTeX Linux Lowongan Kerja BUMN/SWASTA Mac Majalah Tech Material Physics Material Physics. Mechanical Engineering (ME) Microsoft 365 Microsoft Excel Microsoft Office Microsoft PowerPoint Microsoft Word NFC Nero Nero Burning 2021 Networking New Technology OSS RBA OTOMOTIF Operating Systems Optic PDF PT Aerotrans Services Indonesia (Garuda Indonesia Group) PT Astra Tol Nusantara (ASTRA Infra) PT Indomarco Prismatama (Indomaret Group) PT Indonesia Epson Industry PT Jakarta Industrial Estate Pulogadung PT Pertamina Training & Consulting (PTC) PT. Indofarma (Persero) PT. Kimia Farma Group Perizinan Berusaha Persetujuan Lingkungan Pinjaman Online Posgraduate Postgraduate PowerPoint Presentations Profil Perusahaan/Company Profil Profil-Perusahan Publisher Pyrolysis Quantum Computing Quantum Physics Quiz Renewable Energy Research SEO SWASTA Scholarship Semi conductor Semiconductor Sertifikat Halal Smartphone Spintronic Study Abroad Super Capasitor Superconductor Tata Cara Pendaftaran Surat Izin Usaha Industri (SIUI) Technology Tecnology Thailand The Best Trip & Travel Tutorial United Kingdom United Stated United States VGA card Website Windows 365 Windows Tips Word Document WordPress Zero Waste chromium tricks font iphone iphone 13 Pro iphone 13 Pro Max iphone 13 Pro Max gsmarena online zodiak