Tampilkan postingan dengan label Beginner. Tampilkan semua postingan

How to Set The Appearance of The Mobile Version of The Blog to be Mobile Friendly

Each blog template has its own HTML or coding code that you can change or edit according to your taste, but remember. To edit the appearance of the blog or the appearance of the blogger template so that it is SEO friendly, you must know how to edit the mobile version of the template, so that when people open your blog or access your blog using mobile or cellular, it looks like the desktop version, but using mobile. Everyone has a smartphone that is used to access the internet, thus increasing the number of blog views or the number of accesses to your website or blogger. 

On this page, we will discuss how to set the mobile version of the blog display to make it mobile-friendly. There are several ways that you can do so that the appearance of your blog appears in the mobile version. This method is very powerful for increasing the number of visits to your blog or for getting unique and many blog visitors. Let's go straight to the topic of discussion on how to change the appearance of the blog to the mobile version, or how to set up the desktop version of the blog using the mobile version. 

1. First, please "login" to your blog using the email account and password that you have created. 

2. Change the language to the language of your country to make it easier to operate the mobile-friendly template display. 

3. Then you select "Theme" as shown below.


https://www.practicalintroduction.com/2021/08/how-to-set-appearance-of-mobile-version.html


4. After you select the theme, it will appear to the right of "custom (Modified)". Then click CUSTOMIZE. 


https://www.practicalintroduction.com/2021/08/how-to-set-appearance-of-mobile-version.html


5. Then the next column will appear where you select "Mobile Settings".


https://www.practicalintroduction.com/2021/08/how-to-set-appearance-of-mobile-version.html


6. Next, the Mobile Theme (Mobile Friendly) column will appear and choose "Mobile". If so, click SAVE.
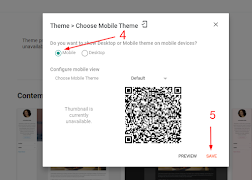

https://www.practicalintroduction.com/2021/08/how-to-set-appearance-of-mobile-version.html


7. If you want to display the mobile version of the blog, or when the blog page is accessed using a smartphone, but the page display is the same as using a desktop. Then you select "desktop", as shown below. Then the appearance of the blog will be in accordance with what you want.


https://www.practicalintroduction.com/2021/08/how-to-set-appearance-of-mobile-version.html


8. The admin blog uses the "desktop" option. Please try to access the admin blog using a smartphone to find out the results of the "desktop" option. 

Well, that's how to change the appearance of the mobile version of the blog or the desktop version by using the two options above. Hopefully, this article can help you. 

Thank you all for visiting my blog and wait for the next update. 😊

Share:

How to Lock Microsoft Word So It Can't Be Opened

Locking a Microsoft Word file or document has a function to protect the document or file so that it can not be accessed by everyone. The goal is clear so that the contents of this document or file can be maintained so that only certain people can access it. Usually, important and confidential documents or files need to be properly guarded so that they can not be seen or read by other people who might misuse them. Microsoft Word has a feature to lock this document with a password that no one else can access, except those who have the password.

This article will give you a short way to lock a Microsoft Word document or file. For more details, friends can follow the following method. 😊

1. Open a Microsoft word document. The first thing you have to do is open a new document and create its contents. However, if you already have a document that will be locked, then you just need to open the Microsoft Word document.

2. If the document is already open, then you can click the file menu as shown in the picture. If you click the file "Menu", you will see many sub-menus.


In the next step, you can click the "info" in the sub-menu to bring up various document locking features.

3. If the "info" in the sub-menu has been opened, then you can choose the "protect document" feature as shown in the picture.


Then several document protection options will appear. You can choose the "encrypt with password" option. If the password has been filled in, then next click OK to proceed to the next dialog box.


4. After the encrypt with password option appears, a dialog box will appear containing that you are asked to enter the desired password.


After the second dialog box appears, you are asked to confirm your password by re-entering the password that you created in the first dialog box.


5. If it is successful, it will appear "A password is required to open this document".


6. Save the document. If the document has been passworded, then you can save the document before closing the Microsoft Word file or document.

7. Open the document to make sure it's locked. To ensure that the document has been locked properly, you can open the document or Microsoft Word file. If it's really locked and can't be opened, then the process that you have done is correct.

This is information about how to lock a Microsoft Word file or document so that it can not be opened. If you have more complete information regarding locking Microsoft Word files or documents, you can also share them in the comments column below. Hopefully, this article about locking Microsoft Word files or documents can provide benefits for friends who read it completely.

Thank you everyone for visiting my blog and waiting for the next update. 😊

Share:

How to Convert PDF Files to PPT (PowerPoint) online

The PPT or PPTX file formats are usually closely related to document processing software such as Microsoft PowerPoint. However, we can also generate PPT files from other file formats. For example, if you want to convert a PDF file to PPT, either using an application or without an application, you can also convert PDF files to PPT. More than that, converting PDF files to PPT PowerPoint can also be done online and offline.

It's easier and more practical because we don't have to install the software first. Even better, this method allows you to convert PDF files to PPT only from your cellphone or via a laptop. The PDF file format is indeed more widely used because of several advantages it has, besides the availability of a PDF viewer application that makes PDF files more popular and used.

In the tutorial on converting PDF files to PPT using the free sites at www.ilovepdf.com and smallpdf.com, we present them in more detail with supporting images.


Convert PDF to PPT Files Online

For those of you who don't want to bother installing a PDF converter application first, you can use this method to convert PDF files into PPT. The PDF file conversion site service is also free of charge or free because we will take advantage of the free trial facility.

 1. www.ilovepdf.com

The first reference site that you can use to convert PDF files to PowerPoint online. The easy-to-understand interface makes you more comfortable running it. On this site, you can also convert PDF files to Excel and other types of files.

How to Convert PDF to PPT Files at https://www.ilovepdf.com.

1. Open your favorite browser and click the official page at https://www.ilovepdf.com

2. Select the PDF to Powerpoint box to open it. Please click on the box.


3. Now, to upload a PDF file, you click "Select PDF file". Select the PDF file to upload and then click Open.


4. Then select "Convert to PPTX". Wait a moment during the conversion process.


5. When it's finished, you can click "Download POWERPOINT" to get the PPTX file.


2. https://smallpdf.com

The second reference site that you can use to convert PDF files to PowerPoint online and that can make you more comfortable running is https://smallpdf.com. On this site, you can also convert PDF files to Excel and other file types.

How to Convert PDF to PPT Files at https://smallpdf.com.

1. Open your favorite browser and click the official page at https://smallpdf.com.


2. Select the PDF to PPT box to open it. Please click on the box.


3. Now, to upload a PDF file, you click "Choose file". Select the PDF file to upload and then click Open.


4. Wait a moment during the conversion process. When it's finished, you can click Download File to get the PPT or PPT file.


It's so easy to convert PDF files to PPT without an application through this online service site. 😊

Thank you everyone for visiting my blog and waiting for the next update. Bye Byeeeeee... 😊😊😊

Share:

How to Change Rename, Color, and Font in Excel Tables

If you already have a table or have succeeded in creating a table in Microsoft Excel, then on this page, you will learn how to edit the table in Microsoft Excel. You can change the appearance of the table in Microsoft Excel by renaming it, selecting colors at columns and rows, and changing the font size of the letters. For more information, please read the short tutorial below. let's get started ...... :)


 How to Rename a Table in Microsoft Excel

1. You just click on the table area of Microsoft Excel. Then we will automatically be taken to the Design menu tab.

2. Right in the Properties section, in the Table Name column: You rename the table according to the contents of the table.

Basic Knowladges 1-20621

It is very easy not to rename the table in Microsoft Excel.

Now, for another alternative, you can use another method by opening at Formulas menu tab and then opening at Define Name dropdown menu.

Basic Knowladges 2-20621

Basic Knowladges 3-20621

After that, in the Name section, rename the Excel table as you wish. In-Scope section, select the workbook and then click OK.


=========================================================================

How to Change Table Font Size in Microsoft Excel

1. You select the text or text that you want to increase or decrease the font size.

2. Here I am trying to change the font size of the table header. You go to the Home menu tab, then select Font and scroll down to select the desired font size (20).

3. If you want to make the letters bold, you can select the Bold icon (B) and for italics, you can use Italic (I) and Underscore (U) for underlined text.


=========================================================================

How to Color an Excel Table in Microsoft Excel

1. After you finish creating the table, you select which column or row you want to add or change the color.

2. Then you open the dropdown menu and use a paint bucket to fill in the color icon.

3. Then we will automatically be faced with many color choices, such as yellow, red, green, blue, orange, and others. Here, I chose Green as the table header background color.


4. As a result, the table's background color is not as white as it used to be.

You can also change the color of the letters on the table by opening the Font Color dropdown menu.


Thank you everyone for visiting my blog and waiting for the next update. Bye Byeeeeee... :) :) :)

Share:

How to Change Background / Wallpaper Powerpoint 2013

    Changing the PowerPoint background or wallpaper is one way to make PowerPoint slides interesting. This is because making a presentation that you are doing is said to be successful. One of the supporting factors is an interesting PowerPoint slide. It can also be triggered by the background display or a PowerPoint wallpaper. An attractive background or wallpaper is very important for supporting a presentation. If your slides are ordinary, then the audience might not pay attention. Moreover, what is presented is data in the form of numbers, so this will be very tedious. So, this interesting PowerPoint background or wallpaper can help if you have difficulty getting the attention of the audience. Basically, Microsoft PowerPoint has a plethora of wallpapers, backgrounds, and appealing designs to choose from. But it can be tedious too, as it has been used by many people. So you can change it by setting up your own wallpaper or background.
    Here's how to change the PowerPoint wallpaper. It is easy and fast. In this example, I use Microsoft PowerPoint 2013, but for other versions of PowerPoint, I think it's almost the same. So, hopefully, the differences between these versions aren't too perplexing.
  • Open the PowerPoint file that you want to change the wallpaper or background.
Home PowerPoint Indrawan

  • In Microsoft PowerPoint 2013, take a look at the menu options at the top. Then select the design menu.


  • If you haven't used a PowerPoint theme/template, then you can choose one of the available theme/template designs. If you already have a theme/template, you can skip the next three steps.
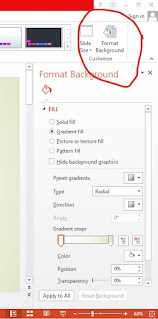
  • In the design menu, the far-right position is the "FORMAT BACKGROUND" sub-menu. Now, select this sub-menu to change the wallpaper or PowerPoint slide background.

Format Background Indrawan

  • There are 5 options, namely solid fill, gradient fill, picture or texture fill, pattern fill, and hiding the background graphics.
  1. The solid fill is used to change the color of the background. There are many color choices that friends can use.
  2. The gradient fill is used to change the color of the background. Here you can do color gradations, for example, a combination of blue and white, and so on. There are several color gradation positions that can be used.
  3. Picture or texture fill. This function is to replace the background or wallpaper with an image. Friends, all you have to do is prepare your own photos on your computer and upload them to PowerPoint; later, the background or wallpaper will be transformed into photos/images of your friends. Not only that, in this menu, Microsoft PowerPoint also provides a choice of images. For example, images of water motifs, stone motifs, wood, and so on. So it's more helpful for friends who have trouble finding good pictures.
  4. The pattern fill function is used to change the theme of the PowerPoint background or wallpaper. For example, the motif of dots, small squares, and so on.
  5. And the last thing is hiding the background graphic, which serves to remove or hide the wallpaper or PowerPoint background. As a result, it later appeared as a plain white thing.
  • If you want to use 1 background for all slides, at the bottom of the background format sub menu there is an option to apply to all. However, if you want each slide to have a different background or wallpaper, you have to change the background one by one, and this is very inefficient (wasting time).
  • Don't forget to save it. Sometimes, many people forget to save their work, so what is done in Microsoft Office is lost and they have to start over from scratch.


Thank you everyone for visiting my blog and waiting for the next update. Bye Byeeeeee... :) :) :)
Share:

Creating Stylish Excel Tables

Change the appearance of the table style to be cooler and more stylish with the combination of the Format As Table feature and the Borders feature for a more professional blend of table styles, especially for those of you who want to present in public.

  1. As before, we first select the data we want to enter into the table.
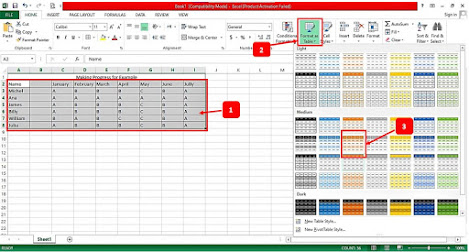
  2. After that, you open the Format As Table dropdown menu, then select a style or table style according to your taste. Here, I choose Gold, Table Style Medium 12.
    Image 1

  3. On the Format As Table pop-up menu, check the My table has headers option. This option instructs Excel to create a header based on the format of our data, so the result is not a column 1,2,3, and so on.
  4. Don't forget to click OK to confirm it.

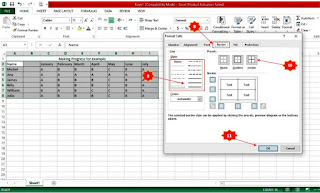
  5. To make the table better, we need to edit or edit it. Please select all of them and open the Bottom Borders dropdown menu, then select More Borders.

  6. On the Format Cells pop-up menu, go to the Border tab, then select the type of line, such as dashed, solid, double, and others.

  7. If you have entered the Presets section, click on the two boxes, namely Outline and Inside, so that all the lines on the table can change their style.
  8. Confirm the setting by pressing the OK button.

  9. The result is very satisfying. The Excel table looks neater and easier to read because there is a filter function. 👍

Thank you everyone for visiting my blog and waiting for the next update. Bye Byeeeeee... :) :) :)
Share:

How to Make a Colored Table in Excel Automatically

        Tables are often used to group important data, for example, for a recap of sales of goods at the end of the month. The table format, which only consists of rows and columns, of course, makes it easier for us to read a report. In this regard, this page will share tips on how to easily create tables in Microsoft Excel and is very suitable for beginners or those who are new to this Microsoft data processing program. Well, create a table in Excel to make it neat and look more professional. You can give color to the Excel table, especially in the header or table head. More than that, in making tables in Microsoft Excel, the problem of choosing a style must also be considered by adjusting to the existing document format.

        Apart from that, editing a table in Excel is also very practical. You can simply thicken the line or table border as you wish. Well, to maximize the creation of a table on a Microsoft Excel worksheet, it is a good idea to do it on a laptop or computer. As a result, the android phone is not ideal, and the interface is too small. Let's get right to it and show you how to make a table in Excel with Windows users.

Steps to Create a Table in Microsoft Excel

        A few tips to quickly start the process of creating a table in Excel, especially if you need it in large quantities, are by copying the Excel table. Without having to start from scratch, you just need to move the data into the Excel table.

Creating Plain Excel Tables

our first tutorial will try to create a table that is commonly used by many Microsoft Excel users, namely by bolding the lines on the table. The method is very simple and easy to follow, especially for those of you who are new to this data processing application.

1. Open the Microsoft Excel worksheet on your computer or laptop.
2. Enter all the required data when you are finished. Please select all of them with the cursor or press the Ctrl+A  keys on the keyboard.


https://www.practicalintroduction.com/2021/06/how-to-create-colored-table-in-excel.html


3. Enter the Font category, then open the Bottom Border dropdown menu, then select All Borders to create a line on the table.
4. Well, next to set the table title or header. You can select it using the cursor, then you select Merge & Center to unite rows and columns into one cell.


https://www.practicalintroduction.com/2021/06/how-to-create-colored-table-in-excel.html

5. The next step is to thicken the table lines to have a neat and attractive appearance. You open the Bottom Borders dropdown menu and select the More Borders option.


https://www.practicalintroduction.com/2021/06/how-to-create-colored-table-in-excel.html


6. Well, after the Format Cells appear, you go to the Border menu tab. In the Line Style section, select the thickest line. If you want to make it more formal, from the Presets section, you can choose Inside and Outline. 
7. Then all the lines inside and outside the table will be bolded. You can check them in the sample border-box below.

https://www.practicalintroduction.com/2021/06/how-to-create-colored-table-in-excel.html


8. Finally, when you have finished setting the line thickness on the table, You click OK to save it.


https://www.practicalintroduction.com/2021/06/how-to-create-colored-table-in-excel.html


Thank you everyone for visiting my blog and waiting for the next update. See you next time... 😊

Share:

Happy Wolrd Teacher Day

Daily Page View

Label

Adobe Acrobat Adobe Photoshop Alexa Rank Andorid Application Art Austria BUMN Beginner Belgium Blog Community Blogger Bupati Gresik CPNS/PPPK Canada Coin Market Cap Computers Cosmology Cryptocurrency Dancing Denmark Doctoral Doker Education Educational Excel Excel Table Features Film Finland French Gadget Gallery Garuda Emas Germany Google Analytics Google Form Hardware Homestay Hong Kong Ilovepdf Indrawan Vpp Interior Design Ireland Italy KKPR dan PKKPR Kampung hijau Karang Taruna Karir/Career Keyword Keywords LKPM LaTeX Linux Lowongan Kerja BUMN/SWASTA Mac Majalah Tech Material Physics Material Physics. Mechanical Engineering (ME) Microsoft 365 Microsoft Excel Microsoft Office Microsoft PowerPoint Microsoft Word NFC Nero Nero Burning 2021 Networking New Technology OSS RBA OTOMOTIF Operating Systems Optic PDF PT Aerotrans Services Indonesia (Garuda Indonesia Group) PT Astra Tol Nusantara (ASTRA Infra) PT Indomarco Prismatama (Indomaret Group) PT Indonesia Epson Industry PT Jakarta Industrial Estate Pulogadung PT Pertamina Training & Consulting (PTC) PT. Indofarma (Persero) PT. Kimia Farma Group Perizinan Berusaha Persetujuan Lingkungan Pinjaman Online Posgraduate Postgraduate PowerPoint Presentations Profil Perusahaan/Company Profil Profil-Perusahan Publisher Pyrolysis Quantum Computing Quantum Physics Quiz Renewable Energy Research SEO SWASTA Scholarship Semi conductor Semiconductor Sertifikat Halal Smartphone Spintronic Study Abroad Super Capasitor Superconductor Tata Cara Pendaftaran Surat Izin Usaha Industri (SIUI) Technology Tecnology Thailand The Best Trip & Travel Tutorial United Kingdom United Stated United States VGA card Website Windows 365 Windows Tips Word Document WordPress Zero Waste chromium tricks font iphone iphone 13 Pro iphone 13 Pro Max iphone 13 Pro Max gsmarena online zodiak