How to Set The Appearance of The Mobile Version of The Blog to be Mobile Friendly

Each blog template has its own HTML or coding code that you can change or edit according to your taste, but remember. To edit the appearance of the blog or the appearance of the blogger template so that it is SEO friendly, you must know how to edit the mobile version of the template, so that when people open your blog or access your blog using mobile or cellular, it looks like the desktop version, but using mobile. Everyone has a smartphone that is used to access the internet, thus increasing the number of blog views or the number of accesses to your website or blogger. 

On this page, we will discuss how to set the mobile version of the blog display to make it mobile-friendly. There are several ways that you can do so that the appearance of your blog appears in the mobile version. This method is very powerful for increasing the number of visits to your blog or for getting unique and many blog visitors. Let's go straight to the topic of discussion on how to change the appearance of the blog to the mobile version, or how to set up the desktop version of the blog using the mobile version. 

1. First, please "login" to your blog using the email account and password that you have created. 

2. Change the language to the language of your country to make it easier to operate the mobile-friendly template display. 

3. Then you select "Theme" as shown below.


https://www.practicalintroduction.com/2021/08/how-to-set-appearance-of-mobile-version.html


4. After you select the theme, it will appear to the right of "custom (Modified)". Then click CUSTOMIZE


https://www.practicalintroduction.com/2021/08/how-to-set-appearance-of-mobile-version.html


5. Then the next column will appear where you select "Mobile Settings".


https://www.practicalintroduction.com/2021/08/how-to-set-appearance-of-mobile-version.html


6. Next, the Mobile Theme (Mobile Friendly) column will appear and choose "Mobile". If so, click SAVE.
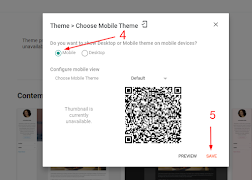

https://www.practicalintroduction.com/2021/08/how-to-set-appearance-of-mobile-version.html


7. If you want to display the mobile version of the blog, or when the blog page is accessed using a smartphone, but the page display is the same as using a desktop. Then you select "desktop", as shown below. Then the appearance of the blog will be in accordance with what you want.
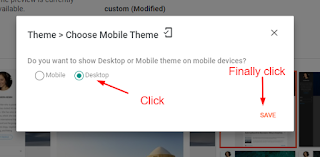

https://www.practicalintroduction.com/2021/08/how-to-set-appearance-of-mobile-version.html


8. The admin blog uses the "desktop" option. Please try to access the admin blog using a smartphone to find out the results of the "desktop" option. 

Well, that's how to change the appearance of the mobile version of the blog or the desktop version by using the two options above. Hopefully, this article can help you. 

Thank you all for visiting my blog and wait for the next update. 😊

Share:

How to Find Out the Hard Drive Capacity of Your Computer or Laptop

By knowing how much hard disk (hard drive) capacity is in your computer or laptop, of course, you can easily understand how much data you can store on your hard disk. The amount of hard disk capacity varies. The greater the capacity of a hard disk, the more certain it will be able to accommodate a lot of data files on the hard disk. You can find out the amount of hard disk capacity directly on the hardware or by using software, but the goal remains the same, namely knowing how much hard disk capacity is. Then how to see the capacity of the hard disk of a computer or laptop?

In the following, we will discuss how to see the capacity of a computer hard disk, how to find out the amount of laptop hard disk capacity in several ways that you can do, so that you know the amount of capacity of a hard disk. This, of course, you must know, either before buying a hard disk or if you have had a hard disk for a long time.


1. How to find out the hard disk capacity from the physical side of its


https://www.practicalintroduction.com/2021/08/how-to-find-out-how-much-hard-drive.html


Usually, every hard disk has a complete description written on the outside or on a sticker affixed to the outside of the hard disk, starting from where the hard disk was made, hard disk brand, hard disk voltage, hard disk amperage, and, of course, the capacity of the hard disk will be stated. For those of you who have a hard disk, please check directly on the outside. You will definitely see a complete description of the hard disk. However, on a new hard disk, the capacity of the hard disk listed on the outside will not be visible, because it is covered by the warranty.


2. How to find out the hard disk capacity from the Windows system


Another way you can find out what size your computer's hard disk is, or if you want to see how much hard disk capacity you have. You can find out the capacity of your laptop's hard disk by looking at the Windows system. How to check the capacity of the hard disk through the Windows system, namely by

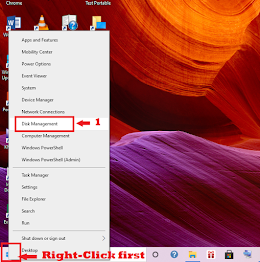
1. Please right-click on "Windows Logo" on Windows 10 or right-click on "Computer" on Windows 7.

2. Next, select "Disk Management" on Windows 10 or select "Manage" on Windows 7.


https://www.practicalintroduction.com/2021/08/how-to-find-out-how-much-hard-drive.html


3. Then you will see how many or how much hard disk capacity you have.

4. Thus, you will be able to more freely, of course, save data files.


https://www.practicalintroduction.com/2021/08/how-to-find-out-how-much-hard-drive.html


That's an easy way to find out the hard disk capacity in your computer or laptop. Hopefully, this short article can add to your insight into knowing the amount of hard disk capacity. 

Thank you everyone for visiting my blog and wait for the next update.😊

Share:

Details, Features, and How to Install Nero Burning ROM 2021

Nero Burning ROM 2021 Download Full Version Free. It is one of the best burning software for Windows 10. This software has functions to burn data, documents, photos, videos, and audio to disc. With its safe and fast capabilities, of course, we can rely on Nero 2021 to handle the process of moving data from a computer to a CD. At first, this application was devoted to burning data onto DVD. But along with the changing times, Nero has turned into multimedia software with many features. Such as media management, media players, utilities, and others. All are packaged with a program called Nero StartSmart Full. To be able to download the latest Nero, you can get it very easily. In some of the links below, there is a download link for the free full version of Nero Burning. In addition, the Nero 2021 serial number is also provided for patching and registration. After that, you can use this program without any restrictions.

https://www.practicalintroduction.com/2021/08/details-features-and-how-to-install.html

Basically, this software can only work on the Windows operating system. Especially for Windows 10, Windows 8, and Windows 7. Where you can enjoy full Nero Windows 64-bit and 32-bit support for free. 

Nero Burning 2021 Full Setup Details Crack

  • Software Full Name: Nero Burning Rom 2021 Full Version.
  • Setup File Name: nerobr2021w.rar
  • Full Setup Size: 188 MB
  • Setup Type: Offline Installer with Crack
  • Compatibility Architecture: 32 Bit & 64 Bit.
  • Latest Release Added On: January 16th, 2021.

Features of the Newest 2021 Nero Burning ROM

  • Burn data, music, and videos to DVD
  • Simple and futuristic user interface
  • Ability to manage file systems from Disc
  • Adding a label to the disc that is burned
  • Customize Nero Burning ROM toolbar with shortcuts
  • Supports CD, DVD, and Blu-Ray
  • Export Audio CD to Computer
  • Protect data when burning
  • Provide passwords and other security for the data
  • Features drag and drop data on an interactive interface.
  • Split a large file into several parts.
  • Support Windows 7, Windows 8, and Windows 10
  • Already supports the latest Windows 10 Redstone 6
  • Nero StartSmart and Nero Express updates
  • Includes Nero 2021 Crack with the latest patch system.


How to Install Nero Burning Full Version 2021

  1. Download the Latest Nero Burning Full Version 2021
  2. Extract the downloaded file with Winrar
  3. Turn off the internet connection first
  4. Run setup and start with a trial
  5. Run Block Host. cmd, right-click, run as administrator
  6. Next, run Patch.exe (Run As Administrator)
  7. Press the Patch button, then click the Serial button.
  8. Register with the Nero 2021 serial number that appears

Thank you everyone for visiting my blog and wait for the next update.😊
Share:

How to Show Hidden Files on a Computer or Laptop

Hidden files or hidden files sometimes make us forget the amount of storage space used by useless files, but we don't know for sure if hidden files that we don't use accumulate on a computer or laptop system, which will certainly have a negative impact on the performance of the computer or laptop system that we use. This can be proven when we want to store data on the hard disk, but the storage space is not sufficient. If we look at the data, there is not so much data or files stored, but why is there not enough storage space? 

Well, this is what happens if we don't clean hidden files that are not used, or don't show hidden files on the computer. Why can hidden files happen? This is, of course, the admin or computer and laptop users setting files to be hidden. This could be because if the file is confidential, then the file is hidden or hidden. Well, if you want to restore the file from hiding, then you must restore the file from the settings first. 

How to restore hidden files? For an easy way to restore hidden files, you have to do several steps as follows. 

1. Please go to the folder where you want to show hidden files.

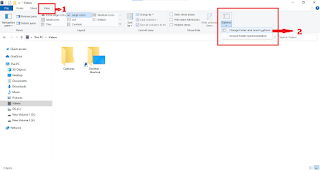
2. Next, select View on the top menu bar.

3. For more details, you can see the example of restoring hidden files below.

4. Next, select Options, then select Change folder and search options to show the folder options window.


https://www.practicalintroduction.com/2021/08/how-to-show-hidden-files-on-computer-or.html


5. Next, in the folder options window, select View on the menu bar and check Show Hidden Files, Folders, and drives. Complete as in the following picture.


https://www.practicalintroduction.com/2021/08/how-to-show-hidden-files-on-computer-or.html


6. Next, select Apply and then select OK.

That's how to restore hidden files on a computer that you can try if you want to free up storage space on your computer or laptop. Hopefully, this short article can help with problems on your computer and can add to your insight. 

Thank you everyone for visiting my blog and wait for the next update. Bye Byeeeeee... 😊

Share:

How to Solve External Hard Disk Not Detected and Requesting Format

Did you know? An external hard drive is very important if you want to back up important data files from a computer or laptop. With an external hard drive, it will certainly make it easier for you to move files or important data that you will move to an external hard drive. However, what if when you are going to move important data files to an external hard drive, suddenly the external hard drive is unreadable, the external hard drive is not detected and the external hard drive asks to be formatted, even though there is a lot of data on the hard drive? Of course, this will make you confused. That's why the review of the article this time the admin published so that it can help solve the problem if you experience this.

Actually, how to solve an external hard drive not being detected by the system has been widely reviewed by other brothers and sisters, but the admin also wants to share the solution to an unreadable external hard drive and how to solve an external hard drive asking for a format. Hopefully, what the admin conveys on this occasion is, of course, useful. When you find the external hard drive asking to be formatted, you will find the following words:

"You need the format disk in drive F: before you can use it. Do you want to format it? "


If you find the writing above when you plug in an external hard drive to a laptop or computer, You don't panic right away and don't format your external hard drive right away, because if you don't know how to properly format your external hard drive, then you might lose important data on your hard drive. Then, how to solve the External Hard Drive not detected on Windows XP, Unreadable External Hard Drive on Windows 7, and the Hard Drive solution Request formatting on Windows 8. Here, the admin gives a review or explanation of how to easily solve an unreadable hard drive on Windows. I hope this article is useful for you all.

1. The first step in overcoming the External Hard Drive If it is not legible and the External Hard Drive asks for a format, please unplug the cable connected to the External Hard Drive, then unplug the cable attached to the computer CPU or the cable attached to your laptop.

2. After you unplug the cable from the hard drive and from the computer CPU or laptop, let it sit for about 3 minutes. Then plug the cable back into the external hard drive and plug it into the CPU too. But you have to remember, don't plug it into the port that you tried earlier, or try to use another slot or port. Who knows which port was the problem before.

3. But if the above method doesn't work, you can try to fix the External Hard Drive not being read by a laptop or computer in the following way. Still in the position where the cable is connected between the External Hard Drive and a computer or laptop, then please go to "Device Manager". If you are using Windows 8, then you can use the search to make it faster, but if you are using Windows 7, then you have to go to the Device Manager in the following way.


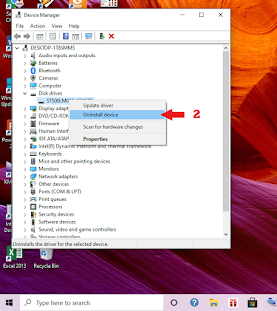
1. How to enter the device manager can be done by right-click Windows Logo, then click "Device Manager". Then you will go directly to the Windows Device Manager window. "

https://www.practicalintroduction.com/2021/08/how-to-solve-external-hard-disk-not.html


2. Then select Disk Driver.


3. Please look for the external hard disk that you have named.


4. Continue by right-clicking and click Uninstall device.


https://www.practicalintroduction.com/2021/08/how-to-solve-external-hard-disk-not.html


5. Then unplug your external hard disk, let it sit for a while, and plug it back in.


6. If it is installed, please click Scan for Hardware Changes or Update Hardware so that the system finds your hard drive.


https://www.practicalintroduction.com/2021/08/how-to-solve-external-hard-disk-not.html


That's an easy way to deal with an external hard disk not being detected or an external hard disk requesting for format. Hopefully, this short article will be useful and can be used as well as possible.

Thank you everyone for visiting my blog and wait for the next update.😊

Share:

Two Tips on How to Easily Create Different Pages in Microsoft Word

How to make different pages in Microsoft Word must be mastered so that document numbering is more organized. Adding numbers to the page is very crucial, especially for those of you who are working on scientific works such as practicum reports, theses, papers, and research reports. For those of you who are processing company reports, you also really need tips on adding or changing the number format on the page.

Here's how to easily create pages in Word:

1. Click the Insert > Page Number menu.

2. Click Bottom of Page.

3. Choose your preferred numbering style (e.g. Plain Number 3).

https://www.practicalintroduction.com/2021/08/how-to-create-different-pages-in-word.html

4. To select numbers with Roman letters or regular numbers and choose which page to start from, then you must visit the Insert > Page Number > Format Page Number menu.

5. If you want to delete a number instantly, then all you need to do is visit the Insert > Page Number > Remove Page Number menu.

https://www.practicalintroduction.com/2021/08/how-to-create-different-pages-in-word.html


How to create different pages in Word is pretty much the same as above, but by using the Page Layout menu.

Here are the steps on how to create different pages in Word:

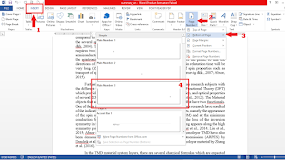
1. Place the cursor on the page you want to add or differentiate.

2. Go to the Layout > Breaks > Next Page menu.

https://www.practicalintroduction.com/2021/08/how-to-create-different-pages-in-word.html

3. In the Header body section, deselect Link to Previous. If the option does not appear, make sure that you have selected the Breaks menu beforehand.

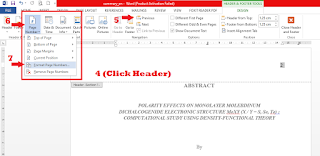
4. Select Page Number, then set the location and numbering style. If the change only affects the first page, make sure Different First Page is not selected.

5. To control the starting number, select Page Number > Format Page Numbers.

6. Click Number format to select a number format, such as (a, b, c), or (i, ii, iii) for the introduction.

https://www.practicalintroduction.com/2021/08/how-to-create-different-pages-in-word.html

7. Close the Header and Footer, or double-click anywhere outside the header or footer area to exit.


This is information about how to create different pages in Microsoft Word. If you have more complete information regarding the settings page in Microsoft Word, you can also share them in the comments column below. Hopefully, this article about how to create different pages in Microsoft Word can benefit friends who read it completely.

Thank you everyone for visiting my blog and wait for the next update. 😊
Share:

Happy Wolrd Teacher Day

Daily Page View

Label

Adobe Acrobat Adobe Photoshop Alexa Rank Andorid Application Art Austria BUMN Beginner Belgium Blog Community Blogger Bupati Gresik CPNS/PPPK Canada Coin Market Cap Computers Cosmology Cryptocurrency Dancing Denmark Doctoral Doker Education Educational Excel Excel Table Features Film Finland French Gadget Gallery Garuda Emas Germany Google Analytics Google Form Hardware Homestay Hong Kong Ilovepdf Indrawan Vpp Interior Design Ireland Italy KKPR dan PKKPR Kampung hijau Karang Taruna Karir/Career Keyword Keywords LKPM LaTeX Linux Lowongan Kerja BUMN/SWASTA Mac Majalah Tech Material Physics Material Physics. Mechanical Engineering (ME) Microsoft 365 Microsoft Excel Microsoft Office Microsoft PowerPoint Microsoft Word NFC Nero Nero Burning 2021 Networking New Technology OSS RBA OTOMOTIF Operating Systems Optic PDF PT Aerotrans Services Indonesia (Garuda Indonesia Group) PT Astra Tol Nusantara (ASTRA Infra) PT Indomarco Prismatama (Indomaret Group) PT Indonesia Epson Industry PT Jakarta Industrial Estate Pulogadung PT Pertamina Training & Consulting (PTC) PT. Indofarma (Persero) PT. Kimia Farma Group Perizinan Berusaha Persetujuan Lingkungan Pinjaman Online Posgraduate Postgraduate PowerPoint Presentations Profil Perusahaan/Company Profil Profil-Perusahan Publisher Pyrolysis Quantum Computing Quantum Physics Quiz Renewable Energy Research SEO SWASTA Scholarship Semi conductor Semiconductor Sertifikat Halal Smartphone Spintronic Study Abroad Super Capasitor Superconductor Tata Cara Pendaftaran Surat Izin Usaha Industri (SIUI) Technology Tecnology Thailand The Best Trip & Travel Tutorial United Kingdom United Stated United States VGA card Website Windows 365 Windows Tips Word Document WordPress Zero Waste chromium tricks font iphone iphone 13 Pro iphone 13 Pro Max iphone 13 Pro Max gsmarena online zodiak